Slides from the North American Collaboration Summit 2019

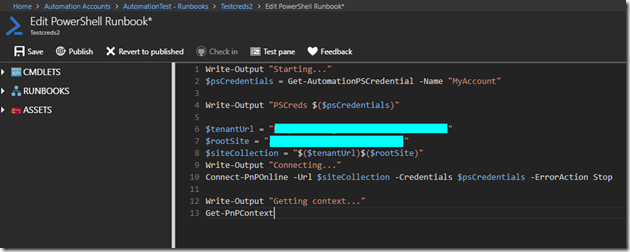
As promised, here are my slides from the North American Collaboration Summit 2019 presentation from yesterday, “Using Azure Runbooks to Automate SharePoint Tasks”

Speaking at the Granite State SharePoint Users Group on Thursday, April 5

In case you missed my session last month at the Boston Area SharePoint Users Group, I will be delivering my session “Easily Integrating a Chat Bot into SharePoint” at the Granite State SharePoint Users Group next month, on Thursday, April 5th.

Session Abstract

​Chat Bots are very commonplace these days. They have been around for years, but advances in AI technology have allowed for a large growth and advances in this area. Microsoft has in preview a service called QnA Maker, that will allow you to create and build a Chat Bot that you can easily integrate into SharePoint using the Azure Bot Framework, all without writing a single line of code. Join me, and I’ll walk you through step-by-step on this process, along with discussing how and where Chat Bots can be used to provide better adoption and support to your users.

Click here for more information and to register! Hope to see you there!

Boston Area SharePoint Users Group March 13, 2018 Meeting

Join us from anywhere! For the first time we’re doing a Skype-only meeting. Read the below for more information, and go here to register! Skype details will be mailed out tomorrow to all registered attendees after registration closes at 5PM EST.

The Boston Area SharePoint Users Group (BASPUG) was founded to bring together like minds to network and share their experiences, triumphs, and tribulations around Microsoft SharePoint, to provide a community platform for Boston area SharePoint users, administrators, developers, architects, of all experience levels, even brand new to SharePoint, to share their knowledge with the community.

THIS MEETING WILL BE ONLINE ONLY OVER SKYPE! MEETING DETAILS WILL BE SENT OUT THE DAY OF THE MEETING AFTER REGISTRATION HAS CLOSED TO ALL REGISTERED ATTENDEES!

Andrew Connell will be presenting "Building Client Web Parts with the SharePoint Framework"
Session Abstract

​The new SharePoint Framework allows development of client side web parts that work on both modern and classic SharePoint pages. In this session you’ll learn how to put the Framework to work building and deploying these web parts. You’ll learn how to develop web parts that are editable from the SharePoint page, and that are responsive and look like part of the overall SharePoint experience. Don’t miss this opportunity to hit the ground running with this new SharePoint development model.

About the Speaker

Andrew Connell is a full stack web developer with a focus on Microsoft Azure & Office 365, specifically the Office 365 APIs, SharePoint, Microsoft’s .NET Framework / .NET Core, Angular, Node.js and Docker that enjoys development, writing & teaching… if it’s cutting edge web you will find Andrew there! He has received Microsoft’s MVP award every year since 2005 and has helped thousands of developers through the various courses he’s authored and taught both in-person & in online courses. Recently he launched his own on-demand video platform, Voitanos (https://www.voitanos.io) to deliver his on-demand video training.

Throughout the years Andrew has been fortunate enough to share what he has learned at conferences like Microsoft’s TechEd, Build, Ignite & SharePoint conferences, Angular’s ngConf & AngularU, SPTechCon, SP Live 360, and Techorama among many others all around the world in North America, Europe, Asia & Australia. You can find Andrew on his popular blog (http://www.andrewconnell.com), follow him on Twitter @andrewconnell, check out some of the numerous projects he’s involved in on GitHub (http://www.github.com/andrewconnell) or listen to his popular weekly podcast, The Microsoft Cloud Show (http://www.microsoftcloudshow.com), which is focused on Microsoft cloud services such as Azure and Office 365 as well as the competitive cloud landscape.​

LOCATION

​For the first time, we’ll be doing a completely remote meeting over Skype! Skype meeting details will sent out after registration has closed on the day of the meeting, around 5PM on March 13, 2018. So, please register in advance to make sure you receive the details!

LINKED IN
Join our group on LinkedIn today to connect with the rest of the BASPUG members, and spread the word!

FACEBOOK
We are also on facebook! http://www.facebook.com/#!/pages/Boston-Area-SharePoint-User-Group/113652405354617

TWITTER
Follow news about the Boston Area SharePoint Users Group on twitter by following us @BASPUG, and by using the hashtag #BASPUG

WEB
Visit the Boston Area SharePoint Users Group website at http://www.bostonsharepointug.org

ORGANIZERS
Event meetings are organized by Geoff Varosky of BlueMetal and James Restivo of Crow Canyon Systems.

Please visit The Boston SharePoint Area Users Group page for more event details!

Have questions about Boston Area SharePoint Users Group March 13, 2018 Meeting? Contact Boston Area SharePoint Users Group

Slides from February 13, 2018 BASPUG Meeting

Thank you all who came out last night to see my presentation at the Boston Area SharePoint Users Group last night!

As promised, here are my slides from the presentation, hosted on SlideShare:

And here is a link to the blog post which contains all of the steps we demoed during the presentation: https://sharepointyankee.com/2018/01/23/creating-a-chat-bot-with-microsofts-qna-maker-and-azure-bot-service/

Boston Area SharePoint Users Group February 13, 2018 Meeting

Hey, guess what? I’m speaking at the BASPUG in February… come join me! We’ve moved to a new night – Tuesday, works better for everyone who helps out with the group.

Read the below for more information, and click here to register!

The Boston Area SharePoint Users Group (BASPUG) was founded to bring together like minds to network and share their experiences, triumphs, and tribulations around Microsoft SharePoint, to provide a community platform for Boston area SharePoint users, administrators, developers, architects, of all experience levels, even brand new to SharePoint, to share their knowledge with the community.

Geoff Varosky will be presenting “Easily Integrating a Chat Bot into SharePoint”

Session Abstract

​Chat Bots are very commonplace these days. They have been around for years, but advances in AI technology have allowed for a large growth and advances in this area. Microsoft has in preview a service called QnA Maker, that will allow you to create and build a Chat Bot that you can easily integrate into SharePoint using the Azure Bot Framework, all without writing a single line of code. Join me, and I’ll walk you through step-by-step on this process, along with discussing how and where Chat Bots can be used to provide better adoption and support to your users.

About the Speaker

​Geoff Varosky is a Senior Architect for BlueMetal, a division of Insight, based out of Watertown, MA. He has been architecting and developing web based applications his entire career, and has been working with SharePoint for the past 13 years. Geoff is an active member of the SharePoint community, Co-Founder and Co-Organizer of the Boston Area SharePoint Users Group, co-founder for the Boston Office 365 Users Group, co-organizer for SharePoint Saturday New England.

MEETING SPONSOR – BlueMetal

​Modern technology, craftsman quality. We’re an interactive design and technology architecture firm matching the most experienced consultants in the industry to the most challenging business and technical problems facing our clients. We seek to understand your business strategy and technical foundation to craft modern applications that holistically blend strategic vision, creative design, architecture, and innovation, to exactly meet your needs and ensure your success.​​

SUSTENANCE

Food and beverages will be provided at the meeting free of charge from our meeting sponsor. Food arrives at about 6PM. We generally have pizza (with and without meat), as well a salad, water, and sodas.​​

RAFFLE PRIZES

We will be handing out raffle tickets at the BASPUG meetings.

LOCATION

The meeting will be held at the BlueMetal Boston Office at 9 Galen St, Suite 300, Watertown, MA.​ Parking is FREE, and available in the main lot, and behind the building along the river.
Walk in the main building entrace (not the side of the bus stop), go to the back, take the elevator up to the 3rd floor, and the BlueMetal office is right in front of the elevator.

LINKED IN
Join our group on LinkedIn today to connect with the rest of the BASPUG members, and spread the word!

FACEBOOK 
We are also on facebook! http://www.facebook.com/#!/pages/Boston-Area-SharePoint-User-Group/113652405354617
TWITTER
Follow news about the Boston Area SharePoint Users Group on twitter by following us @BASPUG, and by using the hashtag #BASPUG
WEB
Visit the Boston Area SharePoint Users Group website at http://www.bostonsharepointug.org
ORGANIZERS
Event meetings are organized by Geoff Varosky of BlueMetal and James Restivo of Crow Canyon Systems.


Please visit The Boston SharePoint Area Users Group page for more event details!

Creating Runbooks in Azure and Calling Them from SharePoint Using Webhooks and Flow

AzureFlowSharePointAutomationRunbooks are a feature of Azure Automation that allow you to execute workflows from within Azure or remotely to automate processes.

To give an example, lets say you have a script that monitors an Azure service every 5 minutes to see if it is running or not. The script, will test and see the status of an Azure App Service. If it tests the site, and does not get the HTTP 200/OK message, then it triggers an alert, creates a ticket, and now someone has to go recycle the Azure App Service. If this can happen frequently, then it is something you would look to automate.

In comes the Azure Automation Runbook. You create a PowerShell script that is hosted in Azure (a Runbook), and when your script detects that the service is not responding, it makes a call out to a URL, and the URL runs the Runbook, which restarts the Azure App Service. The monitoring script then runs again, sees that the service is back up, and the appropriate steps are taken.

This might seem like a lot of extra work, but, if you are, say, connecting in through a VPN to manage an Azure environment, it can be quite time consuming just to restart a service.

However, we are not using that as our working example in this article. That was just to give you an idea of the kinds of things that can be done using Runbooks. In this article, we will be showing you how to create a Runbook, and call it from SharePoint, using Microsoft Flow. It will not be a real exciting example either, but, it will show you how to do all this, so you can do more on your own!

Prerequisites

This article assumes the following:

  • You have an Azure subscription. If you do not, you can get one here for free to play around
  • You have SharePoint Online

Creating an Azure Automation Account

Before we can create our Runbook, we need to create an Azure Automation Account. Login into the Azure Portal, click on New > Monitoring + Management > Automation

image

Configure the following settings for your Automation Account:

  • Name: What are you going to call it?
  • Subscription: Select the subscription to use
  • Resource Group: Either create a new one, or, use an existing.
  • Location: Which Azure region should this run in? I am using East US 2… since I’m in the East US.
  • Create Azure Run As account: This is not needed for our test, but, if you’re doing anything in Azure with your runbooks, you will want to configure this. For more information, visit: https://docs.microsoft.com/en-us/azure/automation/automation-offering-get-started#authentication-planning

image

Then press Create.

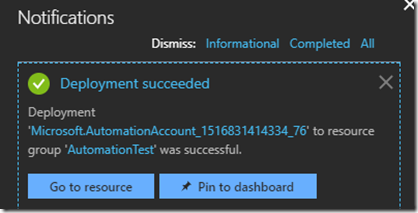
It’ll take a moment while this deploys…

image

Once done… access it either by the Automation Accounts blade on the left side, or, via the Notifications link Go to resource once its done deploying.
image

And you will be brought to the landing page for your Automation Account, AutomationTest

image

Creating an Azure Automation Runbook

Now that we have our Automation Account, we need to create our runbook. From within the Automation Account, click on Runbooks under Process Automation on the left hand side.

image

Then click Add a runbook at the top of the runbooks dashboard

image

Click on Quick Create / Create a new runbook

image

Fill in the details

  • Name: Check-Website
    Give your runbook a name
  • Type: PowerShell
    You can also choose Python 2, Graphical, PowerShell Workflow, and Graphical PowerShell Workflow
  • Description: Check the status of a website
    Enter in a description for the runbook

Then click on Create

image

And viola! Your runbook has been created!

image

It doesn’t do anything yet, so, we will need to add code. Click on Edit at the top of the dashboard.

Here is where we will type out, or paste in our PowerShell code for the runbook.

image

NOTE: Do not use Write-Host, there is no “host” per-say to write to. Instead, ensure all output is written using Write-Output

Let’s add the following code to test if Google is up and running…

Function OutputStatus($type,$status) {
    Write-Output "$type | $status";
}

Function Get-HTTPSStatus($url,$type) {
    $HTTPSStatus = Invoke-WebRequest $url -Method Get –UseBasicParsing
    if ($HTTPSStatus.StatusCode -eq "200") {
        return OutputStatus -type $type -status "Success"
    } else {
        return OutputStatus -type $type -status "Error"
    }
}

Get-HTTPSStatus "http://www.google.com" "Google Website"

image

Click on Save

image

Now lets test it…click on Test pane

image

Click on Start

image

You will see a message that it is being submitted

image

You can then see that it gets queued

image

And finally, we see the status and the output displayed

image

Pretty neat!

Now, lets say we want to add some parameters to our script, so we can specify the input… and not have it statically set as just “http://www.google.com” as the site, and “Google Website” as the description. Let’s update the code with some parameters…

To get back to your code, click on Edit PowerShell Runbook in the breadcrumb navigation at the top

image

Update our code with the parameters $Site and $Description, and then Save, and then go back on over to the Test pane

image

You can now see we have two fields for Site and Description under Parameters. Fill those out…

image

And run the script again…

image

Looks good! Now… we can do this all day from within Azure… but remember way back to the start of this article, I mentioned calling this from Microsoft Flow from within SharePoint? To do that… we’re going to need to make a change to our script, as well as create a webhook.

First, lets change our script. You know how we just added parameters? Well, when calling a webhook, we’re going to be making a REST call to a URL. We cannot pass in parameters like we just did to the script. That is good for running within Azure itself… in order to pass parameters to our runbook via a webhook… we need to change the parameters. We will be passing in an object called WebhookData (or whatever else you want to call it). Which will be the JSON data sent along with the REST call. So, let’s update our code to this:

image

We will then parse out the Site and Description name/value pairs from that and pass it into our script from the $WebhookData object.

The code for the above is here:

Param (
    [object]$WebhookData
)

Function OutputStatus($type,$status) {
    Write-Output "$type | $status";
}

function Get-HTTPStatus($url,$type) {
    $HTTPStatus = Invoke-WebRequest $url -Method Get –UseBasicParsing
    if ($HTTPStatus.StatusCode -eq "200") {
        return OutputStatus -type $type -status "Success"
    } else {
        return OutputStatus -type $type -status "Error"
    }
}

if ($WebhookData -ne $null) {
    Get-HTTPStatus $WebhookData.RequestHeader.Site $WebhookData.RequestHeader.Description
} else {
    Write-Error "No data received in webhook call."
}

We need to Publish it first before creating the webhook. Go back to the code view, and click on Publish

image

It will prompt you to confirm, click Yes, and it’ll be published.

image

Now that we’ve got that straightened out… let’s move on to creating our webhook.

Creating a Runbook Webhook

From our runbook Dashboard, click on Webhook at the top of the dashboard

image

Click on Webhook – Create a new webhook

image

Then give it a name, and an expiration date, and if it should be enabled or not…

image

Now… notice the big warning sign at the top of this screen…

image

See? Now… copy and paste that URL at the bottom, and save it somewhere. There is no way to get this URL once the webhook has been created.

image

Once you have done that, click OK

Then click on Parameters and run settings and then click OK there

image

Then click Create at the bottom of the form. Until you do that, you can still get the webhook URL…

Ok… now what? Let’s call it from PowerShell, since we need to do a POST to access it.

image

We can see in the Content section of the output, we are given a JobId of 4164eb1f-57ba-41c3-a7cb-2f556652e9ad

In our runbook, if we go to Jobs under Resources

image

We can see that a job successfully ran

image

Click on it, and we can see the status, and you will see the JobId matches what we got from the call from Invoke-WebRequest

image

You will see there were errors… because we didn’t actually send any data along with it. We just called it directly. But now that we have it… we can move on to SharePoint and Flow.

Creating a Flow to Call our Webhook from SharePoint

Now that we’ve gone through the meat an potatoes of this project… let’s look at linking at all together with SharePoint and Flow.

Log into your SharePoint Online tenant… and lets create a new list.

I’ve got a basic custom list called Flowtest

image

Now… once created, in the Modern interface… click on Flow > Create a flow

image

Click on See your flows at the bottom, because we’re going to create a brandy-new one…

image

Click on + Create from blank at the top of the page

image

Click on Search at the bottom of the next screen, and search for SharePoint created… we want to add a trigger for when a new item is created in our list.

image

Select SharePoint – When an item is created

Select your SharePoint Online site from the list, or, enter in the URL, then select the list… in this case, we’re using Flowtest

image

Then click + New step > Add an action

image

Click on HTTP under Connectors

image

Choose HTTP – HTTP

image

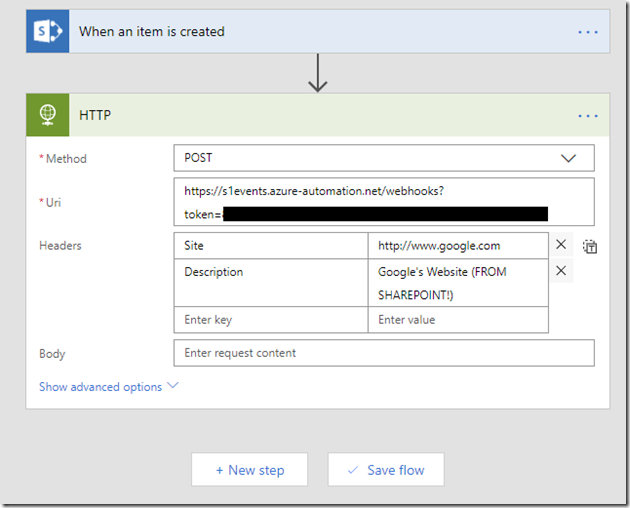
Then fill out the details…

  • Method: POST
  • Uri: The URL we copied when we created our webhook
  • Headers
    Site:
    http://www.google.com
    Description: Google’s Website (FROM SHAREPOINT!)
image

And then click on Save Flow

Also… don’t forget to give your flow a name Smile

image

You should now see your Flow

image

Now… open a new window, and go back to your list, and create a new item…

image

And if you check back on your flows…

image

You will see one succeeded!

Clicking on it will give you the breakdown of the flow run (which is one of the more awesome features of Flow… over IFTTT IMHO FWIW YK?)

image

Now… let’s go check Azure…

If we look at the jobs for our Runbook… we’ll see a new one in there…

image

Click on it, and then click on the output

image

image

It worked!

Now… let’s make this a bit more functional. Go back to your list settings in SharePoint

image

I’ve changed the Title field to URL, and added a field called Description as a single line of text.

image

Now, let’s go back to our Flow…

And edit the HTTP step

image

Edit the values for Site and Description, and then select the corresponding Site and Description values from the Dynamic Content list that pops up to the right. See what we’re doing here?

image

Let’s run our Flow… create a new list item, passing in a URL and Description…

image

and check the status…

image

It worked! It’s a day of miracles people! While this is not a really exciting example, it shows how to use Azure Runbooks and Webhooks, and how they can be accessed remotely to do a specific task.

What sort of cool things are you doing or have you done with Flow and Runbooks, if anything?

Resources and References

Connecting to SharePoint Online using the PnP PowerShell Library and NOT Having to Log In Every. Single. Time…

imageBefore you can do anything with the SharePoint Patterns & Practices PowerShell library, you need to first connect to SharePoint Online. Sounds pretty basic, right? You need to establish who you are, and maintain your access during your session with the site you are working with.

Now, the Documentation does show you how to do this:

image

Connect-PnPOnline –Url https://geoff365.sharepoint.com –Credentials (Get-Credential)

When you do this… you are prompted for credentials… Every. Single. Time.

image

This is good for production, however, if you are developing a script, you may run this tens or hundreds of times… and, it gets old pretty fast. So, here is what I do. In my script, I set variables for the username and password (alternatively, you could pass these as parameters, and pass them along using a batch file).

image

Then, I convert the password into a secure string, and create a PSCredential object with the username and secure password.

image

I can then connect to SharePoint Online using the Connect-PnPOnline command (as shown above), wrapped in a try/catch block, and not be prompted for credentials!

image

Here’s the full script:

#region Imports
Import-Module SharePointPnPPowerShellOnline -WarningAction SilentlyContinue
#endregion Imports

#region Variables
$Username = "admin@geoff365.onmicrosoft.com"
$Password = "ThisIsNotMyRealPassword!"
$SiteCollection = "https://geoff365.sharepoint.com/sites/powershellplayground"
#endregion Variables

#region Credentials
[SecureString]$SecurePass = ConvertTo-SecureString $Password -AsPlainText -Force
[System.Management.Automation.PSCredential]$PSCredentials = New-Object System.Management.Automation.PSCredential($Username, $SecurePass)
#endregion Credentials

#region ConnectPnPOnline
try {
    Connect-PnPOnline -Url $SiteCollection -Credentials $PSCredentials
    if (-not (Get-PnPContext)) {
        Write-Host "Error connecting to SharePoint Online, unable to establish context" -foregroundcolor black -backgroundcolor Red
        return
    }
} catch {
    Write-Host "Error connecting to SharePoint Online: $_.Exception.Message" -foregroundcolor black -backgroundcolor Red
    return
}
#endregion ConnectPnPOnline

Boston Office 365 Group Launch

BosO365-UG-Logo-650x225

Are you curious about Office 365? What it is, how it can save you time and help you be more productive? Are you getting the full benefits of all that Office 365 has to offer?

One of the ways for people to get the most out of this new and constantly evolving suite of products is to have people to turn to; a place to go to explore new features and functionality or just learn more, share experiences and ask questions. Formal training is great (we strongly encourage ongoing training for users of the Office 365 suite of products), but there are times when you just want to interact with others or ask a simple question.

Help has arrived. Jornata is pleased to be a founding organizer of the Boston Office 365 User Group. Our co-organizers include Microsoft, Wellington Street Consulting, Slalom Consulting and Cognizant Technology Solutions. The group will met monthly, beginning on Thursday, May 22nd, and on the third Thursday of every month thereafter. The event will take place at Microsoft’s New England Research and Development Center (NERD) at One Memorial Drive in Cambridge. Attendance is free and food and beverages will be provided. You can learn more and register for the meeting or join the mailing list.

Fittingly, for the initial event, Microsoft’s Chris Bortlik will present an overview of Office 365. His discussion will include an overview of current Office 365 functionality, including Yammer, Lync Online, mobile applications and Office 365 Pro Plus. He’ll also explore administration and update issues. Chris is an Office 365 technology architect at Microsoft.

There are plenty of ways to keep the conversation going. We have a web site, Linked In group and Yammer group, or you can follow us on Twitter @Bos365.

We want this to be your group. Feedback, ideas, and suggestions are welcome. What topics would you like to see the group address? Are there other elements that you feel should be added to the program? We’ll provide a place to air your grievances and perhaps learn how others have dealt with the issues you’ve encountered.

We’re also looking for event sponsors to provide food, beverages and raffle prizes for the events or pick up the tab for the Office 365 Happy Hour that will follow each meeting at a local bar or restaurant. If you’re interested, or know anyone who might be, please contact us.

We look forward to seeing you there!

I have a Public SharePoint Online site?

Yes. Yes you do. Well, if you have Office 365 and it is part of the license which you purchased. You didn’t have to do anything, you have a public facing (anyone on the internet can hit it just like a normal website) website.

Where is it?

It’s easy to find. Go into the SharePoint Online Admin Center

image

Select the first link on the left side navigation (the default) site collections

image

And in the listing on the right side of the page, it will be listed first under Public Website

image

The default URL will be http://yourtenantname-public.sharepoint.com.

And if you go there…You’ll see a nice SharePointy and Cloudy site…

image


Oh Cool! Now I can create a website like Ferrari in Office 365/SharePoint Online????

No. As of yet, SharePoint Online in Office 365 does not contain all of the super awesome Web Content Management and publishing controls that SharePoint 20XX on-premises does.

Oh…

Yep.

Ok, the public website is enough for my needs, can I create more than one?

No. Once you have one created, you cannot create another one. It will appear greyed out when attempting to create a new site collection.

image

Oh…

Yep.